If you’re a photographer drowning in high-resolution files, you already know that the best hard drive is actually a strategic system, not just a single piece of hardware. The sweet spot for a modern workflow is a hybrid setup: the blistering speed of a Solid-State Drive (SSD) for your active edits, paired with the affordable, massive capacity of a Hard Disk Drive (HDD) for long-term archiving. For any working pro, this isn't an upgrade—it's a necessity.
Navigating the Data Overload in Modern Photography
The storage crisis for photographers is very real. Today's cameras pump out enormous RAW files, 4K video is the new normal, and a single complex client project can swallow gigabytes of space. Relying on a single drive is a recipe for disaster. It doesn't just create frustrating bottlenecks in your workflow; it puts your entire business at risk. Choosing the right storage is a foundational decision, not just a tech spec to check off a list.
The Two Pillars of Photo Storage
A solid photography storage strategy is built on two very different technologies: SSDs and HDDs. They each have a specific job, and trying to make one do the work of the other will only lead to headaches. You'll either suffer through sluggish editing or overpay for archival space.
Solid-State Drives (SSDs): Think of these as your digital workbench. Built with flash memory, they deliver incredible read/write speeds that make them perfect for your operating system, editing software, and the projects you're actively working on. Culling thousands of shots in Lightroom or running complex actions in Photoshop feels night-and-day faster on an SSD.
Hard Disk Drives (HDDs): These are your deep-storage archives. HDDs use traditional spinning platters to offer massive capacity at a very low cost per terabyte. They are the go-to solution for storing completed client galleries, RAW backups, and your entire life's work for the long haul.
A hybrid storage system isn't a luxury; it's a necessity. Using an SSD for active work and an HDD for archiving gives you the best of both worlds—speed where it counts and affordable capacity for everything else.
Why Your Niche Matters
The sheer volume of files we create is staggering. Take real estate photographers, for example. A shoot for a single luxury home, complete with HDR brackets, drone footage, and 360° virtual tours, can easily top 100GB. That's especially true when you're shooting with modern 60MP cameras that produce RAW files well over 100MB each.
Worse yet, the stakes are incredibly high. Shocking studies reveal that nearly 60% of photographers experienced some form of data loss in the past year, a stark reminder of what happens when storage systems fail. You can read more about the storage challenges photographers face on Digital Journal.
This guide will walk you through the critical decisions you need to make—from SSD vs. HDD and portable vs. desktop to picking the right connections—so you can build a bulletproof workflow that protects your images and keeps your business running smoothly.
SSD vs. HDD: Your Workflow's Speed Engine and Archive Vault
The debate between Solid-State Drives (SSDs) and Hard Disk Drives (HDDs) isn't about which one is better—it's about assigning the right tool to the right job. For a working photographer, this decision directly impacts your efficiency and the security of your life's work. Think of it this way: your SSD is the high-performance editing suite, and your HDD is the vast, secure archive.
Trying to make one do the other's job is a recipe for frustration. You'll either get bogged down by maddeningly slow performance that costs you billable hours, or you'll overspend on speed you simply don't need for long-term storage. The smart move is to build a hybrid system where each drive's strengths cover the other's weaknesses.
Speed Where It Counts: The SSD at Work
You really feel the power of an SSD the moment you dump a full memory card. On an old-school HDD, you could go make a cup of coffee while Lightroom chugs through generating 1:1 previews. With a good NVMe SSD, those same previews pop up almost instantly. This lets you fly through culling hundreds of RAW files, making your selects in a fraction of the time.
That speed advantage isn't just for imports, either. It follows you through the entire editing process. Whether you're applying complex masks, running heavy filters in Photoshop, or stitching a huge panorama, your drive's read/write speed is often the bottleneck. A standard SATA SSD might hit around 500 MB/s, but modern NVMe SSDs can scream past 3,000 MB/s. That's a different universe compared to the sluggish 150 MB/s you'd be lucky to get from a portable HDD.
For active, day-to-day editing, an SSD isn't a luxury—it's a time machine. The minutes you save on every import, every preview, and every export add up to hours of productive time you get back each and every week.
Cost-Effective Capacity: The HDD as Your Archive
Once a project is finished and delivered, the need for blazing speed disappears. Now, the game is all about safe, affordable, long-term storage. This is exactly where the trusty old HDD comes in, standing tall as the undisputed champion for any professional photographer's archive.
HDDs offer an unbeatable cost-per-terabyte. That's not just a spec; it's what makes it financially possible to keep every RAW file from every shoot you’ve ever done. You can grab a massive 16TB desktop HDD for what a much smaller 4TB SSD would cost. This financial reality is the cornerstone of a solid backup strategy, allowing you to afford multiple copies of your entire business archive without draining your bank account.
Here’s what that hybrid workflow looks like in the real world:
- Working Drive (SSD): This is your main drive, either internal or a fast portable one, typically 1TB - 4TB. It holds your OS, editing software, and all your current, in-progress projects. Its speed is what makes your daily grind feel smooth.
- Archive Drive (HDD): This is a big desktop HDD (8TB or larger) that acts as your permanent vault. When a job is done, you move the entire project folder—RAWs, selects, exports, everything—from the SSD over to this drive.
This simple separation keeps your fast, expensive storage clean and ready for new work, while your massive, inexpensive storage reliably protects your completed portfolio.
SSD vs HDD: What Photographers Need to Know
To really drive home their different roles, it helps to see a direct comparison based on the tasks you do every day. This isn't about tech specs for their own sake; it's about how they perform in a photography business.
| Factor | Solid-State Drive (SSD) | Hard Disk Drive (HDD) | Best Use Case for Photographers |
|---|---|---|---|
| Active Editing | Excellent. Near-instant loading of large RAW files, fast preview generation, and smooth application of edits. | Poor. Sluggish performance when culling, editing, and exporting, leading to significant workflow delays. | An SSD is the only real choice for a primary working drive. |
| Archival Storage | Expensive. High cost-per-terabyte makes it impractical for storing large volumes of completed projects. | Excellent. The low cost-per-terabyte is perfect for building massive, affordable archives and redundant backups. | The HDD is the industry standard for long-term, high-capacity photo archiving. |
| On-Location Use | Excellent. No moving parts mean it’s highly resistant to bumps and drops, keeping data safe in the field. | Fair. Its mechanical parts are vulnerable to impact damage, which is a real risk when traveling. | A rugged portable SSD is the ideal tool for backing up memory cards on-site. |
| Data Longevity | Good. While there's a limit to write cycles, it's rarely a practical issue for photo storage. Requires power periodically. | Very Good. A proven, reliable technology for long-term "cold storage" when handled carefully and stored properly. | Both are reliable, but HDDs are the most cost-effective choice for offline archives. |
In the end, the best hard drive for photographers isn’t a single piece of hardware—it’s a system. By pairing a fast SSD for your daily work with a high-capacity HDD for your archive, you create a workflow that’s optimized to respect both your time and your budget.
2. Portable vs. Desktop Drives: What's the Right Tool for the Job?
The moment you leave your office, your storage needs flip upside down. The best hard drive setup for a photographer isn't a single device—it’s a system. Understanding the unique roles of portable and desktop drives is the first step toward building a workflow that’s both fast on the go and rock-solid at home.

Think of it like this: your portable drive is your camera bag, while your desktop drive is your studio archive. One is built for speed and survival in the wild, the other for massive capacity and long-term security in a controlled space. Trying to make one do the other's job is a recipe for frustration and, worse, data loss.
Portable Drives: The On-Location Workhorse
Portable drives are your frontline tool in the field. They’re the critical link between hitting the shutter and getting your images safely into your editing workflow. For any serious photographer today, a portable SSD is non-negotiable for a few key reasons.
First up is durability. Unlike a traditional HDD with its fragile, spinning platters, a portable SSD has zero moving parts. This makes it incredibly resistant to the bumps, drops, and general chaos that come with shooting on location. A ruggedized, shock-resistant drive lets you breathe easy when you're dumping memory cards in a crowded event space or out on a windy shoot.
Then there’s pure convenience. Most portable drives are bus-powered, meaning they get all the juice they need straight from your laptop's USB or Thunderbolt port. No more hunting for a wall outlet or lugging around a clunky power brick. Their tiny footprint means they slide into any pocket of your camera bag without a second thought.
Finally, a portable SSD is the perfect "shuttle drive." It's ideal for bouncing active projects between your powerful desktop machine and your laptop, ensuring you’re always working on the latest files without missing a beat.
Desktop Drives: Your Central Archive
If the portable drive is your field agent, the desktop drive is your command center. These units are designed to live on your desk, plugged into their own power source, and act as the permanent, secure home for your entire life's work.
Their biggest advantage? Massive capacity at a much lower cost per terabyte. This is where you can affordably build a multi-terabyte library to house every RAW file from every shoot you’ve ever done, without breaking the bank.
A portable drive is for the work you're doing now. A desktop drive is for the work you've ever done. This distinction is crucial for building a safe and scalable photo archive.
Desktop drives also unlock more advanced storage solutions. Many come in multi-bay enclosures that support RAID (Redundant Array of Independent Disks). A simple RAID 1 setup, for instance, automatically mirrors your files across two separate drives in real-time. If one drive dies, no problem—your images are perfectly safe on the other. It’s a crucial layer of defense against hardware failure.
A Practical Hybrid Workflow That Just Works
The most reliable and efficient workflow leverages the strengths of both drive types. It’s all about protecting your data at every single stage, from capture to final archive.
- On Location: The moment a card is full (or the shoot is over), back it up to a rugged portable SSD. This is your first backup, created before you even pack up your gear.
- Initial Culling: Back at your desk, plug that portable SSD in to start culling, rating, and making your initial edits. The project lives here for a short time.
- Data Transfer: Once you've made your selects, copy the entire project folder from the portable drive to your main internal or external working drive. This frees up your portable SSD for the next gig.
- Archiving: After the project is finished and delivered, move the complete folder from your working drive to your high-capacity desktop HDD for permanent, long-term storage.
Following a simple process like this ensures your nimble portable drive is always ready for action, while your desktop system reliably guards your archives. This is the foundation of a professional storage ecosystem.
Speed and Connectivity: The Unsung Hero of a Fast Workflow
A blazing-fast SSD is a great start, but it's only half the story. The most powerful drive in the world can feel sluggish if it’s shackled to a slow, outdated connection. To get the performance you paid for, you have to pair your drive with the right interface—the digital highway that carries your massive photo files from your camera card to your computer.
Think of it this way: your SSD's raw speed is like a supercar's horsepower, but the connection (USB or Thunderbolt) determines how many lanes are on the racetrack. A Formula 1 car stuck on a single-lane country road isn’t going to set any records. Understanding the differences in these connections ensures you’re not creating a bottleneck that slows down your entire workflow.
Decoding the Ports: USB vs. Thunderbolt
When you shop for a new drive, you'll see a couple of common physical ports, mainly the classic rectangular USB-A and the smaller, reversible USB-C. But here's the crucial part: while USB and Thunderbolt can both use the same USB-C connector, the technology under the hood is worlds apart. That's where the real performance lives.
Here’s a quick rundown of the standards you’ll commonly see:
- USB 3.2 Gen 1: This is the baseline, often marketed as just "USB 3.0," offering speeds up to 5 Gbps. It’s perfectly fine for backing up files to a spinning hard drive (HDD), but it will definitely hold back a modern SSD.
- USB 3.2 Gen 2: A huge improvement, this standard doubles the speed to 10 Gbps. This is the sweet spot for most photographers using portable SSDs, providing more than enough bandwidth to edit directly from the drive without lag.
- Thunderbolt 3 & 4: This is the top tier. Both Thunderbolt 3 and 4 deliver a staggering 40 Gbps of bandwidth. While it's overkill for some, it's an absolute necessity for videographers or commercial photographers working with massive files who need every ounce of speed they can get.
The golden rule is that your connection is only as fast as its weakest link. If you plug a high-end Thunderbolt 4 drive into a USB 3.2 port using a basic USB-C cable, your speeds will drop all the way down to USB 3.2 levels. Everything in the chain—the drive, the cable, and the computer port—has to match.
What Speed Means in the Real World
Lab-tested maximums are nice, but what do these numbers actually mean for you, the working photographer? They mean less time waiting and more time creating.
Imagine dumping a full 128 GB memory card of RAW files. On an older USB 3.0 hard drive, you could be staring at the progress bar for over 15 minutes. With a modern NVMe SSD connected via USB 3.2 Gen 2, that same transfer could be done in less than three minutes. That's a huge difference when you're on a tight deadline.
This speed boost isn't just for transferring files, either. It dramatically improves your editing experience. Culling images in Lightroom, generating previews, or applying complex adjustments in specialized real estate photo editing software becomes snappier and more fluid. The less your software has to wait for the drive to catch up, the more you can stay in your creative flow.
The takeaway is simple: always check the specs on your computer's ports and buy a drive and cable that can make the most of what you have. It's one of the easiest and most effective ways to eliminate frustrating delays from your photography workflow.
Building a Bulletproof Photo Backup Strategy
Picking out the right hard drive is just the first part of the puzzle. The real job is protecting the images you put on it—that's what secures your business. Look, data loss isn't a matter of 'if,' it's 'when.' Every drive will eventually fail, often without any warning. A solid backup strategy is your professional safety net, the one thing that protects your reputation and your clients' irreplaceable memories.

For decades, the gold standard for data protection has been the 3-2-1 backup rule. It’s a simple but incredibly powerful framework that gets rid of any single point of failure. For a working photographer, this isn't some abstract tech guideline; it's the blueprint for sleeping well at night.
Understanding the 3-2-1 Backup Rule
The idea is refreshingly simple and guards against pretty much everything—from a drive dying unexpectedly to theft or a natural disaster. It all boils down to keeping three copies of your data on two different types of media, with one of those copies living somewhere else entirely.
Here’s how you can put that into practice:
- Three Copies of Your Data: This means the original file on your main working drive, plus two separate backups. If one copy gets corrupted or the drive is lost, you still have two other independent copies ready to go.
- Two Different Media Types: This is key. Don't just drag your files to another folder on the same drive. Your backups need to be on physically separate devices, like an external SSD and a desktop HDD. This protects you if one of those drives gives up the ghost.
- One Off-Site Copy: Honestly, this is the step that separates the pros from the amateurs. A fire, flood, or break-in could easily take out every drive in your office at once. An off-site backup—usually a cloud service or even a hard drive stored at a friend's house—ensures you can get your work back no matter what happens at your home base.
A Practical 3-2-1 Setup for Photographers
Let's walk through what a truly bulletproof system looks like. This kind of setup gives you a great mix of speed, massive capacity, and rock-solid security without being a huge headache to manage.
- Copy 1 (Primary Working Drive): This is your main drive—either an internal SSD or a fast external one where you do all your active culling and editing. Think of it as your high-speed "hot" storage for current projects.
- Copy 2 (Local Backup): This should be a big desktop HDD or a Network Attached Storage (NAS) device that lives in your office. The trick here is to use automated software to sync your primary drive to this backup every single day. Set it and forget it.
- Copy 3 (Off-Site Cloud Backup): This is your ultimate insurance policy. Services like Backblaze or Amazon Photos can automatically and continuously upload your files to the cloud. This creates a secure, geographically separate copy of your entire archive that you never have to think about.
A huge mistake I see photographers make is thinking two external drives sitting on the same desk is a complete backup plan. It's not. Without an off-site copy, your entire business is still one disaster—like a fire or theft—away from being wiped out.
The Role of RAID in Your Backup Strategy
While a RAID (Redundant Array of Independent Disks) isn't technically a backup, it adds an incredibly powerful layer of protection against hardware failure for your local storage. It's basically a team of hard drives working together to protect your data.
- RAID 1 (Mirroring): This is the simplest and most common setup for photographers. You get two drives of the same size, and everything you write to the first drive is instantly mirrored onto the second. If one drive fails, the other has an exact, up-to-the-minute copy. You can keep working without losing a single file.
- RAID 5: This is more common for larger setups, like a NAS with four or more drive bays. RAID 5 stripes your data across at least three drives and includes "parity" information. In plain English, if any one of the drives fails, the system can use the data from the remaining drives to perfectly rebuild everything that was on the dead one. It’s a fantastic balance of speed, raw storage space, and data protection.
Think of RAID like having a clone of your main hard drive, ready to take over at a moment's notice. For a real estate photographer, where deadlines are everything, that kind of resilience is crucial. You can find more tips on being prepared for anything in our real estate photography preparation checklist.
At the end of the day, a great backup strategy isn't about buying the most expensive gear; it’s about building a disciplined process. When you combine the 3-2-1 rule with smart hardware choices like RAID, you create a system that truly protects your work, your clients, and your professional reputation from the unexpected. This discipline is what turns a simple pile of hard drives into a genuine, professional archive.
How to Choose the Right Hard Drive for Your Needs
Picking the best hard drive isn't about finding one perfect device; it's about matching the right tool to your specific workflow. Your storage needs are constantly changing, whether it’s due to your photography niche, client demands, or how you’re growing your business. Before you get lost in specs and model numbers, let's figure out which kind of photographer you are.
Are you always on the road, where durability is everything? Or are you mostly in the studio, where massive, secure storage is the real priority? Each scenario points to a completely different type of hard drive.
The Traveling Photographer
If you're constantly on the move—shooting weddings, events, or landscapes in far-flung places—portability and ruggedness aren't just features, they're essentials. Your storage is part of your field kit, and it has to withstand the same abuse as your camera gear.
The clear winner here is a rugged, portable SSD. With no moving parts, it can handle the bumps, jostles, and occasional drops that come with being on location. Bus-powered convenience is also a must-have, letting you back up memory cards with just a laptop and a cable, no wall outlet needed.
For the traveling photographer, your on-the-go drive is your first line of defense against data loss. Prioritize a drive with an IP rating for dust and water resistance and a high drop-protection specification.
The Studio Professional
When your work keeps you in a studio—shooting commercial, product, or portrait photography—your needs pivot from durability to sheer capacity and redundancy. You’re creating huge files and need a central, bulletproof hub for your entire archive.
Your best bet is a high-capacity desktop RAID system. A multi-bay enclosure set to RAID 1 (mirroring) gives you an instant, real-time copy of your data, protecting you if one drive fails. This setup becomes the command center for your entire workflow, a fortress for your portfolio that keeps client work safe from hardware hiccups. Plus, the ability to easily swap out drives makes it a scalable solution for years to come.
The Growing Agency or Real Estate Specialist
For a growing business, a real estate agency, or anyone managing teams and a huge volume of media, a Network Attached Storage (NAS) system is the logical next step. Think of a NAS as a smart, private cloud in your office, connecting everyone to a central file server.
This approach is perfect for collaboration. Team members can grab project files without passing drives around, which is a massive time-saver. A NAS also unlocks advanced backup options, cloud sync capabilities, and expandable storage, making it the ultimate tool for a scaling operation. Many real estate photographers, in particular, find this setup invaluable for juggling assets from countless property shoots. You can dive deeper into the specific needs of this field in our real estate photography gear guide.
Once you identify which of these roles fits you best, you can confidently choose a storage solution that not only works for you today but also grows with your business tomorrow.
Answering Your Top Photo Storage Questions
Picking the right storage can feel overwhelming, so let's tackle some of the most common questions photographers ask. These answers should help you nail down your choices and keep your drives running smoothly.
This handy decision tree breaks down the best starting point based on where you do most of your work—on the road, in the studio, or collaborating with a team.
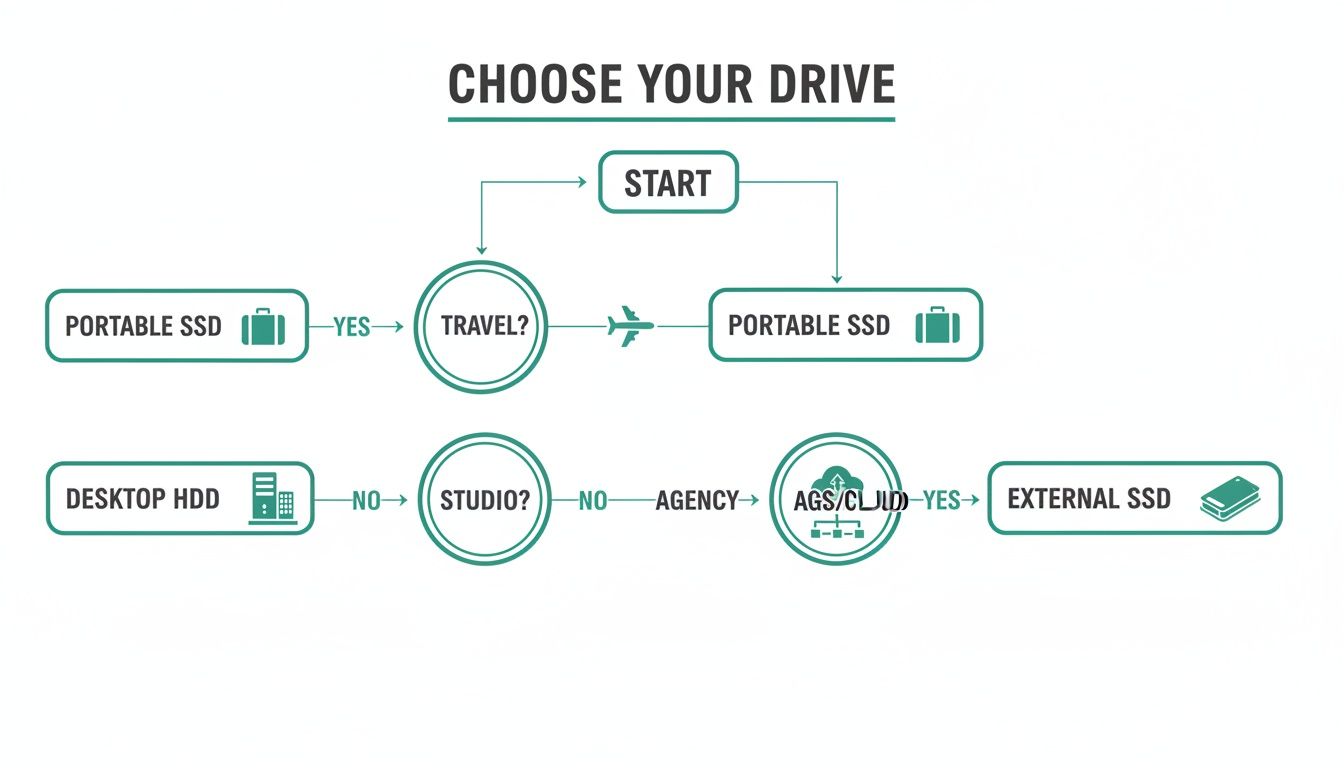
As you can see, your primary work environment really dictates the best storage solution, whether it's a zippy portable drive, a high-capacity desktop unit, or a cloud-based setup.
How Much Hard Drive Space Does a Photographer Need?
For the drive you’re actively working from, a 2TB to 4TB SSD is a great starting point. It gives you plenty of breathing room for several big shoots without constantly juggling files. When it comes to your main archive, though, you need to think much bigger.
A solid rule of thumb is to figure out how much data you create in an average month and multiply that by 36. This gives you a safe estimate for three years of work, ensuring you won't run out of space anytime soon. If you're a high-volume shooter—think real estate or weddings—starting with an 8TB to 16TB archive drive is a smart move from day one.
We often hear worries about SSD lifespan, which is measured in terabytes written (TBW). But here's the thing: photography workflows are mostly read-intensive. The amount of writing you do—saving edits, exporting—is a drop in the bucket for modern SSDs, so write endurance is rarely a practical concern.
Should I Reformat a New External Hard Drive?
Absolutely. It’s the first thing you should do. Most drives ship formatted for the widest compatibility (usually exFAT) or specifically for Windows (NTFS), neither of which might be the best choice for your setup.
Reformatting tailors the drive to your specific operating system for optimal performance.
- Mac Users: Go with APFS. It's built for modern macOS and offers the best speed and features.
- Windows Users: NTFS is your best bet. It’s stable, secure, and the native format for the Windows ecosystem.
- Working on Both? If you need to shuttle files between Mac and Windows computers, stick with exFAT. It’s the universal translator.
This step also wipes any bloatware or pre-installed utilities from the manufacturer, giving you a completely fresh start.
What Is the Lifespan of an External Hard Drive?
This really depends on the technology inside. A traditional HDD, with all its spinning platters and moving arms, has a typical lifespan of 3 to 5 years. After that, mechanical wear and tear starts to become a real risk.
SSDs, on the other hand, have no moving parts and can often last much longer, typically in the 7 to 10-year range. While their life is technically limited by write cycles, as we covered, photographers rarely come close to hitting those limits.
But here’s the critical takeaway: any drive, whether it's an HDD or an SSD, can fail without warning. That’s why a bulletproof 3-2-1 backup strategy isn't just a suggestion—it's an absolute necessity for any professional.
At PropPhoto, we help talented photographers find real estate agents who need high-quality property visuals. Join our platform to showcase your portfolio, connect with clients directly, and simplify your booking process.

